
오늘은 자바를 이용한 Thread 프로그래밍에 대해서 알아보고자 한다.
프로세스 vs 쓰레드
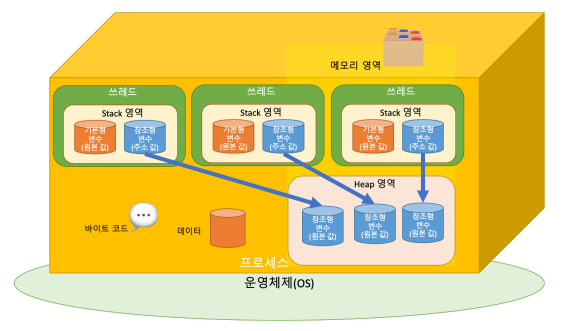
- 프로세스 : 운영체제로 부터 자원을 할당받는 작업의 단위
- 쓰레드 : 프로세스가 할당받은 자원을 이용하는 실행의 단위
쉽게 이야기하면 프로세스는 실행중인 프로그램을 의미하며, 이런 프로그램은 OS위에서 실행된다. OS는 프로그램 실행을 위한 프로세스를 할당해줄때, 프로세스 안에 프로그램 Code와 Data 그리고 메모리영역(Stack, Heap)을 함께 할당해준다.
- Code : Java main 메소드와 같은 코드
- Data : 프로그램이 실행 중 저장 할 수 있는 저장 공간(전역변수, 정적변수, 배열 ..)
- Memory(메모리 영역) :
- Stack: 지역변수, 매개변수 리턴 변수를 저장하는 공간
- Heap: 프로그램이 동적으로 필요한 변수를 저장하는 공간(new(), mallock())


쓰레드
쓰레드는 프로세스내에서 일하는 일꾼에 비유 할 수 있다. 프로세스가 작업중인 프로그램에서 실행요청이 들어오면 쓰레드를 만들어 명령을 처리한다. 프로세스 안에는 여러 쓰레드들이 있고, 쓰레드들은 실행을 위한 프로세스 내 주소 공간이나 메모리 공간(Heap)을 공유 받는다. 또한 쓰레드들은 각각 명령처리를 위한 자신만의 메모리공간(Stack)도 할당 받는다.
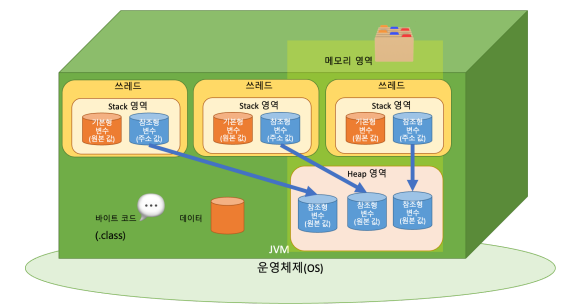
자바 프로그램은 실행하면 JVM 프로세스 위에서 동작하며, 자바 프로그램 쓰레드는 Java Main 쓰레드부터 실행되며 JVM에 의해 실행된다.
멀티 쓰레드
Java는 메인 쓰레드가 main() 메서드를 실행시키면서 시작한다. 쓰레드는 2가지의 종류가 있다.
- 싱글 쓰레드 : 프로세스 안에서 하나의 쓰레드만 실행되는 것
- Java 프로그램에서는 main() 메서드만 실행했을때 이것을 싱글 스레드라고 한다.
- main 메서드의 쓰레드를 '메인 쓰레드' 라고 부른다.
- JVM의 메인 쓰레드가 종료되면, JVM도 같이 종료된다.
- 멀티 쓰레드 : 프로세스 안에서 여러 쓰레드가 실행되는 것
- 하나의 프로세스는 여러개의 쓰레드를 가질 수 있고, 이 쓰레드는 프로세스의 자원을 공유한다.
- 여러개의 쓰레드를 통해 여러개의 작업을 동시에 처리 할 수 있어 성능적으로 효율적이고, 스택을 제외한 모든 영역에서 메모리를 공유하기 때문에 자원을 보다 효율적으로 사용 할 수 있다.
- 하지만 동기화(프로세스의 자원을 공유하면서 작업을 처리하기에 자원을 서로 사용하려고 하는 충돌이 발생하는 것을 의미) 문제나 교착 상태(데드락 : 둘 이상의 쓰레드가 서로의 자원을 원하는 상태가 되었을 때 서로 작업이 종료되기만을 기다리며 작업을 더 이상 진행하지 못하는 상태)의 문제점을 가지고 있다.
쓰레드 구현하기
Java에서는 Thread 라는 클래스를 상속받아 쓰레드를 구현하는 방법과 Runnable 인터페이스를 통해 구현하는 방법 2가지를 제공한다.
1. Thread Class을 상속받아 처리하기
main.java
public class Main {
    public static void main(String[] args) {
        TestThread thread = new TestThread();
        thread.start();

    }
}

class TestThread extends Thread {
    @Override
    public void run() {
        for (int i = 0; i < 100; i++) {
            System.out.print("*");
        }
    }
}
2. Runnbale 인터페이스를 이용하여 구현하기
main.java
public class Main {
    public static void main(String[] args) {
        Runnable run = new TestRunnable();
        Thread thread = new Thread(run); // 쓰레드 생성
        thread.start(); // 쓰레드 실행

    }
}

class TestRunnable implements Runnable {
    @Override
    public void run() {
        for (int i = 0; i < 100; i++) {
            System.out.print("*");
        }
    }
}
쓰레드를 생성할때는 클래스를 직접 상속받아 처리하기 보다는 Runnable을 사용하여 구현하는 방법을 선호한다. Runnable은 인터페이스이기 때문에, 다중 상속의 이점을 받을 수 있기 때문이다.
람다식을 이용하면 좀 더 편하게 쓰레드를 구현 할 수 있다.
main.java
public class Main {
    public static void main(String[] args) {
        Runnable task = () -> {
            int sum = 0;
            for (int i = 0; i < 50; i++) {
                sum += i;
                System.out.println(sum);
            }
            System.out.println(Thread.currentThread().getName() + " 최종 합 : " + sum);
        };
        Thread thread1 = new Thread(task);
        thread1.setName("thread1");
        Thread thread2 = new Thread(task);
        thread2.setName("thread2");
        thread1.start();
        thread2.start();
    }
}- thread.setName을 통해 쓰레드에 이름을 부여한다.
- Thread.currentThread().getName()을 통해 실행중인 쓰레드의 이름을 반환한다.
- 현재 코드에서 두 쓰레드의 실행 순서나 걸리는 시간은 OS의 스케줄러에서 처리한다.
데몬 쓰레드와 사용자 쓰레드
- 데몬 쓰레드 (Demon Thread) : 보이지 않는 곳에서 실행되는 낮은 우선 순위를 가진 쓰레드를 말한다. 대표적인 예로는 메모리 영역을 정리하는 가비지 컬렉터가 있다.
- 사용자 쓰레드 : 보이지 않는 곳에서 실행되는 높은 우선순위를 가진 쓰레드를 말한다. 대표적으로 메인 쓰레드가 있다.
main.java
public class Main {
    public static void main(String[] args) {
        Runnable demon = () -> {
            for (int i = 0; i < 1000000; i++) {
                System.out.println("demon");
            }
        };
        Thread thread = new Thread(demon);
        thread.setDaemon(true); // true로 설정시 데몬스레드로 실행
        thread.start();

        for (int i = 0; i < 100; i++) {
            System.out.println("task");
        }
    }
}
해당 코드에서 main() 쓰레드와 데몬쓰레드로 설정한 쓰레드 2개가 돌아가는데, demon쓰레드는 우선순위가 낮고 다른 쓰레드가 종료되면 강제 종료 당하기 때문에 main() 쓰레드의 task가 100번이 먼저 찍히면 종료된다.
쓰레드 우선순위
쓰레드가 OS 스케줄러로 인해 실되는 순서나 시간이 다르지만 어느 정도의 우선순위를 부여할 수 있다. 우선 순위가 높으면 더 많은 작업 시간을 부여 받아 빠르게 처리 될 수 있다. 중요한 점은 우선 순위가 높다고 반드시 쓰레드가 종료되는 것이 아닌 점을 확인하자.
main.java
public class Main {
    public static void main(String[] args) {
        Runnable task1 = () -> {
            for (int i = 0; i < 100; i++) {
                System.out.print("$");
            }
        };
        Runnable task2 = () -> {
            for (int i = 0; i < 100; i++) {
                System.out.print("*");
            }
        };

        Thread thread1 = new Thread(task1);
        thread1.setPriority(8);
        int threadPriority = thread1.getPriority();
        System.out.println("threadPriority = " + threadPriority);

        Thread thread2 = new Thread(task2);
        thread2.setPriority(2);

        thread1.start();
        thread2.start();
    }
}- setPriority() : 쓰레드 우선 순위를 설정한다. (1 ~ 10)
- 최대 우선 순위(MAX_PRIORITY) = 10
- 보통 우선 순위(NROM_PRIORITY) = 5
- 최소 우선 순위(MIN_PRIORITY) = 1
- getPriority() : 쓰레드의 우선순위를 반환한다.
쓰레드 그룹 생성
서로 관련이 있는 쓰레드들을 그룹으로 묶어서 다룰 수 있다. 쓰레드 들은 기본적으로 그룹에 포함되어 있으며 JVM이 싲가되면 system 그룹이 생성되고 쓰레드들은 기본적으로 system 그룹에 속해 돌아간다. 메인 쓰레드는 system 그룹 하위에 있는 main 그룹에 포함된다.
모든 쓰레드들은 반드시 하나의 그룹에 포함되어야 하며, 쓰레드 그룹을 지정받지 못한 쓰데드는 자신을 생성한 부모 쓰레
드의 그룹과 우선순위를 상속받게 된다. 만약 그룹을 지정하지 않는다면 해당 쓰레드는 자동으로 main 그룹에 포함된다.
main.java
public class Main {
    public static void main(String[] args) {

        Runnable task = () -> {
            while (!Thread.currentThread().isInterrupted()) {
                try {
                    Thread.sleep(1000);
                    System.out.println(Thread.currentThread().getName());
                } catch (InterruptedException e) {
                    break;
                }
            }
            System.out.println(Thread.currentThread().getName() + " Interrupted");
        };

        // ThreadGroup 클래스로 객체를 만듭니다.
        ThreadGroup group1 = new ThreadGroup("Group1");

        // Thread 객체 생성시 첫번째 매개변수로 넣어줍니다.
        // Thread(ThreadGroup group, Runnable target, String name)
        Thread thread1 = new Thread(group1, task, "Thread 1");
        Thread thread2 = new Thread(group1, task, "Thread 2");

        // Thread에 ThreadGroup 이 할당된것을 확인할 수 있습니다.
        System.out.println("Group of thread1 : " + thread1.getThreadGroup().getName());
        System.out.println("Group of thread2 : " + thread2.getThreadGroup().getName());
        thread1.start();
        thread2.start();

        // 현재 쓰레드를 지정된 시간동안 멈추게 합니다.
        try {
            Thread.sleep(5000);
        } catch (InterruptedException e) {
            e.printStackTrace();
        }
        // interrupt()는 일시정지 상태인 쓰레드를 실행대기 상태로 만듭니다.
        group1.interrupt();
    }
}
쓰레드 상태와 제어
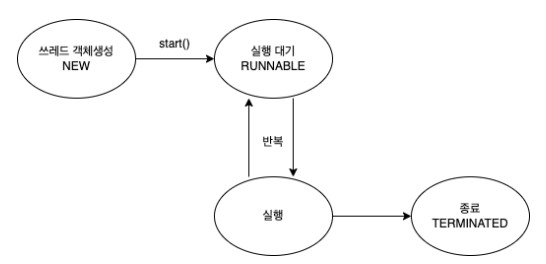
- 쓰레드는 실행과 대기를 반복하며 run() 메서드를 수행한다.
- run() 메서드가 종료되면 실행을 멈춘다.
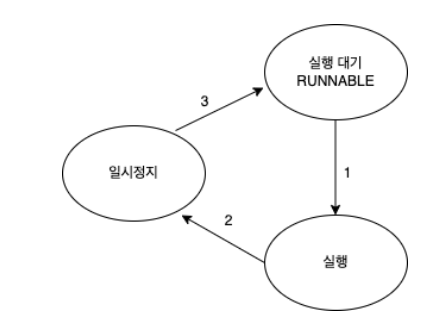
- 쓰레드도 일시 정지 상태로 만들수 있으며 일시 정지 상태에서는 쓰레드가 실행을 할 수 없는 상태가 된다.
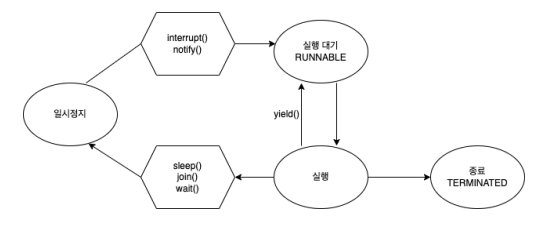
- sleep(ms) : 현재 쓰레드를 ms(밀리초) 단위 동안 멈추게 한다.
- interrupt() : 일시정지 상태인 쓰레드를 실행대기 상태로 만든다.
interrupt
public class Thread implements Runnable {
    /* Make sure registerNatives is the first thing <clinit> does. */
    private static native void registerNatives();
    static {
        registerNatives();
    }
    private volatile String name;
    private int priority;
    /* Whether or not the thread is a daemon thread. */
    private boolean daemon = false;
    /* Interrupt state of the thread - read/written directly by JVM */
    private volatile boolean interrupted;

    ...

    public void interrupt() {
        if (this != Thread.currentThread()) {
            checkAccess();
    // thread may be blocked in an I/O operation
            synchronized (blockerLock) {
                Interruptible b = blocker;
                if (b != null) {
                    interrupted = true;
                    interrupt0(); // inform VM of interrupt
                    b.interrupt(this);
                    return;
                }
            }

        }
        interrupted = true;
    // inform VM of interrupt
        interrupt0();
    }

    ...
    public boolean isInterrupted() {
        return interrupted;
    }
}
Thread 클래스 내부에는 interrupted가 되었는지 체크하는 boolean 변수가 존재한다. 쓰레드는 start() 된 후 동작하다 interrupt()을 만나 실행하면 interrupted 상태가 true가 된다. 참고로 sleep() 실행 중 interrupt()가 실행 되면 예외가 발생한다.
아래는 예외 발생 코드의 예이다.
public class Main {
    public static void main(String[] args) {
        Runnable task = () -> {
            try {
                Thread.sleep(1000);
                System.out.println(Thread.currentThread().getName());
            } catch (InterruptedException e) {
                e.printStackTrace();
            }
            System.out.println("task : " + Thread.currentThread().getName());
        };
        Thread thread = new Thread(task, "Thread");
        thread.start();
        thread.interrupt();
        System.out.println("thread.isInterrupted() = " + thread.isInterrupted());
    }
}
해당 예외는 !Thread.currentThread().isInterrupted()로 interrupted 상태를 체크해서 처리하면 오류를 방지 할 수 있다.
public class Main {
    public static void main(String[] args) {
        Runnable task = () -> {
            while (!Thread.currentThread().isInterrupted()) {
                try {
                    Thread.sleep(1000);
                    System.out.println(Thread.currentThread().getName());

                } catch (InterruptedException e) {
                    break;
                }
            }
            System.out.println("task : " + Thread.currentThread().getName());
        };
        Thread thread = new Thread(task, "Thread");
        thread.start();
        thread.interrupt();
        System.out.println("thread.isInterrupted() = " + thread.isInterrupted());
    }
}
join
정해진 시간동안 지정한 쓰레드가 작업하는 것을 기다린다. 시간을 지정하지 않았을 때는 지정한 쓰레드의 작업이 끝날 때까지 기다린다.
Thread thread = new Thread(task, "thread");

thread.start();
try {
    thread.join();
} catch (InterruptedException e) {
    e.printStackTrace();
}
- join을 사용할 때에는 예외처리를 해야한다.
- interrupt()을 만나면 기다리는 것을 멈추기 때문에 InterruptedException일 발생 할 수있다.
- 시간을 지정하지 않아서 thread가 작업을 끝날때 까지 main쓰레드는 기다리게 된다.
public class Main {
    public static void main(String[] args) {
        Runnable task = () -> {
            try {
                Thread.sleep(5000); // 5초
            } catch (InterruptedException e) {
                e.printStackTrace();
            }
        };
        Thread thread = new Thread(task, "thread");
        thread.start();
        long start = System.currentTimeMillis();
        try {
            thread.join();
        } catch (InterruptedException e) {
            e.printStackTrace();
        }
// thread 의 소요시간인 5000ms 동안 main 쓰레드가 기다렸기 때문에 5000이상이 출력됩니다.
        System.out.println("소요시간 = " + (System.currentTimeMillis() - start));
    }
}
yield
남은 시간을 다음 쓰레드에게 양보하고 쓰레드 자신은 실행대기 상태가 된다.
public class Main {
    public static void main(String[] args) {
        Runnable task = () -> {
            try {
                for (int i = 0; i < 10; i++) {
                    Thread.sleep(1000);
                    System.out.println(Thread.currentThread().getName());
                }
            } catch (InterruptedException e) {
                Thread.yield();
            }
        };

        Thread thread1 = new Thread(task, "thread1");
        Thread thread2 = new Thread(task, "thread2");

        thread1.start();
        thread2.start();
        try {
            Thread.sleep(5000);
        } catch (InterruptedException e) {
            e.printStackTrace();
        }
        thread1.interrupt();
    }
}
윗 코드를 살펴보면, thread 1, 2가 1초에 한번씩 출력되다가 thread1에서 interruptedException이 발생하여 Thread.yield()가 실행된다. thread1은 실행대기 상태로 변경되며 남은 시간은 thread2에게 리소스가 양보된다.
Synchronized
멀티 쓰레드의 경우에는 여러 쓰레드가 한 프로세스의 자원을 공유하는 작업을 하기 때문에 서로에게 영향을 준다. 따라서 장애나 버그가 발생할 수 있다.
- 이러한 일을 방지하기 위해 쓰레드가 진행중인 작업을 다른 쓰레드가 침범하지 못하도록 막는것을 쓰레드 동기화(Synchronization)이라고 한다.
- 동기화 하려면 다른 쓰레드의 침범을 막아야하는 코드들을 임계영역으로 설정한다.
- 임계영역에는 Lock을 가진 단 하나의 쓰레드만 출입이 가능하다.
동기화 방법은 2가지가 있는데 실행할 메서드 또는 실행할 코드 묶음 앞에 synchronized 를 붙여 임계영역을 지정하여 사용하는 방법이다.
// 메서드 전체를 임계영역으로 지정한다.
public synchronized void asyncSum() {
...침범을 막아야하는 코드...
}

// 특정 영역을 임계영역으로 지정한다.
synchronized(해당 객체의 참조변수) {
...침범을 막아야하는 코드...
}
다음은 동기화가 왜 필요한지에 대한 예제이다.
public class Main {
    public static void main(String[] args) {
        AppleStore appleStore = new AppleStore();
        Runnable task = () -> {
            while (appleStore.getStoredApple() > 0) {
                appleStore.eatApple();
                System.out.println("남은 사과의 수 = " + appleStore.getStoredApple());
            }
        };

        // 3개의 쓰레드를 만들어서 시작함
        for (int i = 0; i < 3; i++) {
            new Thread(task).start();
        }
    }
}
class AppleStore {
    private int storedApple = 10;

    public int getStoredApple() {
        return storedApple;
    }

    public void eatApple() {
        if (storedApple > 0) {
            try {
                Thread.sleep(1000);
            } catch (InterruptedException e) {
                e.printStackTrace();
            }
            storedApple -= 1;
        }
    }
}
해당 코드에서는 쓰레드 3개를 만들어 실행을 시키는데, 이 때 남은 사과의 수가 뒤죽박죽 출력될 뿐만 아니라 없는 사과까지 먹어버리는 경우가 발생한다. 따라서 이를 동기화를 통해 수정하면 아래와 같이 진행된다.
public class Main {
    public static void main(String[] args) {
        AppleStore appleStore = new AppleStore();
        Runnable task = () -> {
            while (appleStore.getStoredApple() > 0) {
                appleStore.eatApple();
                System.out.println("남은 사과의 수 = " + appleStore.getStoredApple());
            }
        };
        for (int i = 0; i < 3; i++) {
            new Thread(task).start();
        }
    }
}
class AppleStore {
    private int storedApple = 10;
    public int getStoredApple() {
        return storedApple;
    }
    public void eatApple() {
        synchronized (this) {
            if(storedApple > 0) {
                try {
                    Thread.sleep(1000);
                } catch (InterruptedException e) {
                    e.printStackTrace();
                }
                storedApple -= 1;
            }
        }
    }
}
Wait와 notify
침범을 막은 코드를 수행하다가 작업을 더 이상 진행할 상황이 아니면, wait() 을 호출하여 쓰레드가 Lock을 반납하고 기다리게 할 수 있다.
그럼 다른 쓰레드가 락을 얻어 해당 객체에 대한 작업을 수행 할 수 있게 되고, 추후에 작업을 진행할 수 있는 상황이 되면 notify() 를 호출해서, 작업을 중단했던 쓰레드가 다시 Lock을 얻어 진행할 수 있게 된다.
- wait() : 실행 중이던 쓰레드는 해당 객체의 대기실(waiting pool)에서 통지를 기다린다.
- notify() : 해당 객체의 대기실(waiting pool)에 있는 모든 쓰레드 중에서 임의의 쓰레드만 통지를 받는다.
'Programing Language > Java' 카테고리의 다른 글
| Optional (0) | 2024.05.24 |
|---|---|
| Stream (0) | 2024.05.09 |
| String 객체 (0) | 2024.04.30 |
| Collections Framework (0) | 2024.04.26 |
| [Java] Java가 실행되는 과정과 JDK, JRE (0) | 2023.06.23 |